Flow Car Rental
HERE IS AN EXAMPLE OF SALES FORM FOR CAR RENTAL PRODUCT
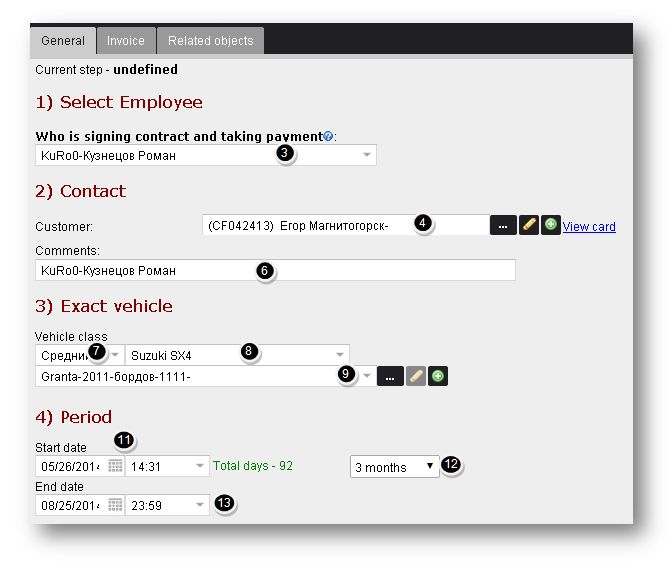
3. In the General section, select the name of the employee from the Who is Signing Contract and Taking Payment drop down list.
4. To connect the contact, click the Browse (![]() ) button.
) button.
The Customer screen will be displayed.
5. Select the customer name that you wish to connect and then click the Select button.
The selected customer will be added to the Customer field.
6. Enter the comments if any, in the Comments field.
7. Select the vehicle class from the Vehicle Class drop down list.
8. Select the vehicle type from the next drop down list.
9. To link the vehicle name, click the Browse (![]() ) button.
) button.
The vehicle page will be displayed.
10. Select the vehicle name that you wish to link and then click the Select button.
The selected vehicle will be added to the Vehicle field.
11. Select the starting date range from the Start Date calendar and select the time from the next drop down list.
12. Select the period from the next drop down list. The available options are 1 day, 3 days, 7 days, 1 month, 3 months, 6 months and 12 months.
13. Based on the selected period, the End Date field will be automatically populated or user can fill End Date manually.
Scroll down to more options.
14. Specify whether drivers can drive without restrictions or not by checking or un-checking the Without Restrictions field.
15. Specify whether the customer is a driver or not by checking or un-checking the Customer is a driver field.
16. To connect the driver, click the Browse (![]() ) button.
) button.
The Driver section of the screen will be displayed.
17. Select the name of the driver that you wish to select and then click the Select button.
The selected driver will be added to the Driver field.
18. Select the starting point of the order for the driver from the Start drop down list.
19. Select the return point for the driver from the Return Point drop down list.
20. Select the name of the territory from the Territory drop down ist.
21. Select the address to deliver the order, from the Delivery Address drop-down list.
22. Select the storage point from the Storage Point drop down list.
23. Navigate to the Invoice tab.
The Invoice section of the screen will be displayed.
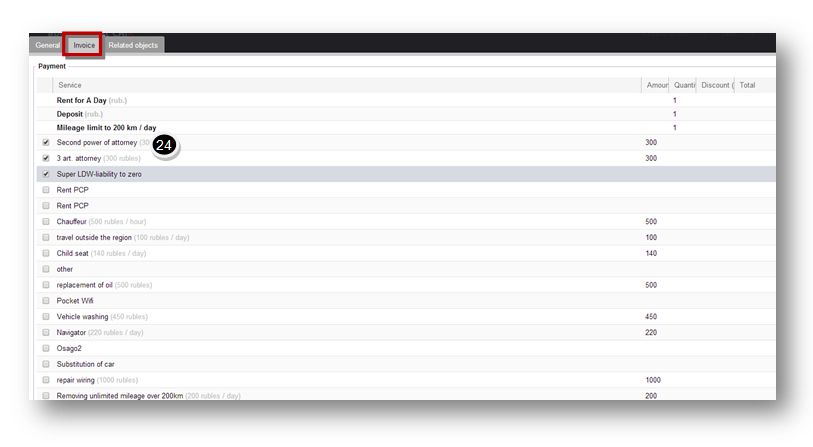
24. Select the items to include for payment in the Invoice section.
25. Scroll down and enter the total discount allowed in the Total Discount field.
26. Enter the coupon discount if any, in the Coupon/Discount Club field.
27. Navigate to the Related Objects tab.
The Related Objects section of the screen will be displayed.
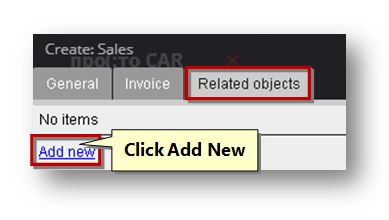
A. Click the Add New link.
The Link Item section of the screen will be displayed.
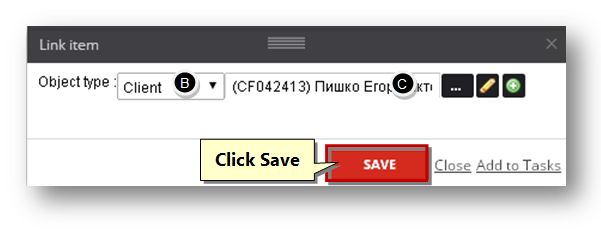
B. Select the type of the object from the Object Type drop-down list. The available options are Sales, Vehicle, Client, Call, Task, Invoice, Payment, Material and File.
C. Select the name of the object by clicking the Browse (![]() ) button.
) button.
The object page will be displayed based on the selected criteria.
D. Select the object that you wish to link and click the Select button.
The selected object will be added to the field.
E. Click the Save button.
The linked item will be added to the related objects section.
28. Click the Save button.
The new sales record will be created.
Sponsored from PaperFree Magazine:
.jpg)
Real Estate Investment Principles by Billionaire Bruce Flatt
Copyright © 2022 PaperFree.com Inc. All rights reserved and data products are owned and distributed by PaperFree.com Inc. and its subsidiaries. | About | Feedback | All Contacts | ID: 979-446-8934 S/N 78675-0 | SID 487999-3 | Version 5.2 Powered by PaperFree.com | Legal